You can see the original Pinterest post here.
Anyways, have you seen any of the wall art that was done where you line up crayons and melt them down the canvas? This idea was basically the same thing, except with a pumpkin!
I started out with a black fake pumpkin from Walmart. You can use a real pumpkin or whatever type of pumpkin you want to use. I wanted to make something that was going to last longer than a real pumpkin, so that is why I went with the fake pumpkin.
The first step was to pain the pumpkin. You may or may not have to do this step depending on your pumpkin. Since my pumpkin was white, I had to do a couple coats of white paint on it. I used acrylic paint from Walmart.
I kept the pumpkin in a box which ended up being really helpful when I started to melt the crayons.
Next you will want to peel the wrappers off the crayons and break them in half. Peeling the wrappers off was more difficult than I thought it would be!
The original directions were to use tacky glue to glue the crayons to the pumpkins. I have tacky glue, but for the life of me I couldn't find it when I needed it. Instead I used a glue gun. It worked well, except obviously that it will start to melt the crayons.
I also had trouble at this point because I spaced the crayons too far apart at first, and then I had to go and redo it. It wasn't a big deal, but depending on the size of your pumpkin, make sure you keep this in mind!
Next is the fun part! Again, this is when the box comes in handy! Turn on that blow dryer and start melting! I did this sitting on the floor with the box sitting on a plastic cover. The crayon will bleed through to the bottom of the box, so just to be on the safe side, I had plastic on the floor so it wouldn't get on my floor. It takes a while to melt and can sometimes splash all over the place, so keep an eye on where the wax is going. Also, I used off brand crayons so this might have impacted my end result.
Here is my pumpkin right after it started to melt. I love the abstractness of this project! And I love colors and rainbows so this was right up my alley!
Here is my pumpkin after I finished. I felt there were some places that didn't get enough variety, so I added some more crayon to those spaces to fill them in. Then I let it dry overnight.
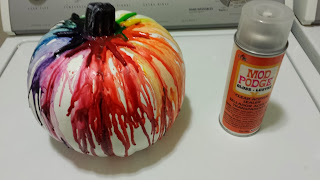
Next step is to seal it! Since my base is acrylic paint, I wanted to make sure that it wasn't going to come off. I used a mod podge acrylic sealer that has a gloss to it. I let this dry overnight as well. It has a wet look to it, but is completely dry. I like the wet look though, it kinda goes with the look of wax melting!
Here is the end result! As you can see, the darker colors definitely showed up better. All in all it was an amazing fun and easy project.


1 comments:
This is fantastic!! If I do any pumpkins this year, I will have to try it this way!!
Post a Comment